


How to Route All Network Traffic from your LAN securely through a SOCKS5 proxy + SSH Tunnel + Redsocks
Note: We no longer support SSH Services
Converting your router into a SOCKS Tunnel can be a useful tool; generally to avoid making individual configuration changes throughout the hosts in your network and centralising configuration for your entire network. This method has many advantages, for one you reduce complexity of installing applications and wont interfere with a running system in any significant way.
A common case for this tool is a traveller who wants to work remotely and tunnel back into the corporate network across all wired/wireless systems within their internal network infrastructure. Another use case might include things like anonymity; being able to browse the internet without disclosing your identify and data encryption for secure web browsing, or for those sport fans who would like to stream games in regional blackout zones. This simple solution to convert your Router into a Socksifying tool will have you giddy in no time.
For the purpose of this document we used a TPLink AC750 Archer C7 Router; therefore, we’ll assume the wired subnet interface is “br-lan” and the Router IP is “192.168.1.1″.
Note: Before beginning you must be subscribed to DNSFlex “Total Security” to gain access to a SOCKS5 Proxy server. If you havent done so already, log into the dashboard to create a username and password. These credentials are applicable to both SSH and SOCKS5 authentication.
Technical Level
- Expert
Prerequisites
Pros
- Centrally administered for your entire network infrastructure
- No third party software to install on your Operating Systems
- Masks your source IP and Geographical Location
- Encrypts ALL your data
Cons
- Encrypted data will slow down your network connection due to overhead and compression
- Requires advanced network administration skills
We will assume you already have a functional OpenWRT powered router so we are ready to begin the process. With any programming task there is risk, please backup your current configuration in the event of a failure so you can restore the system to original operating state.
Before you begin – DNSFlex SOCKS5 and SSH Server information
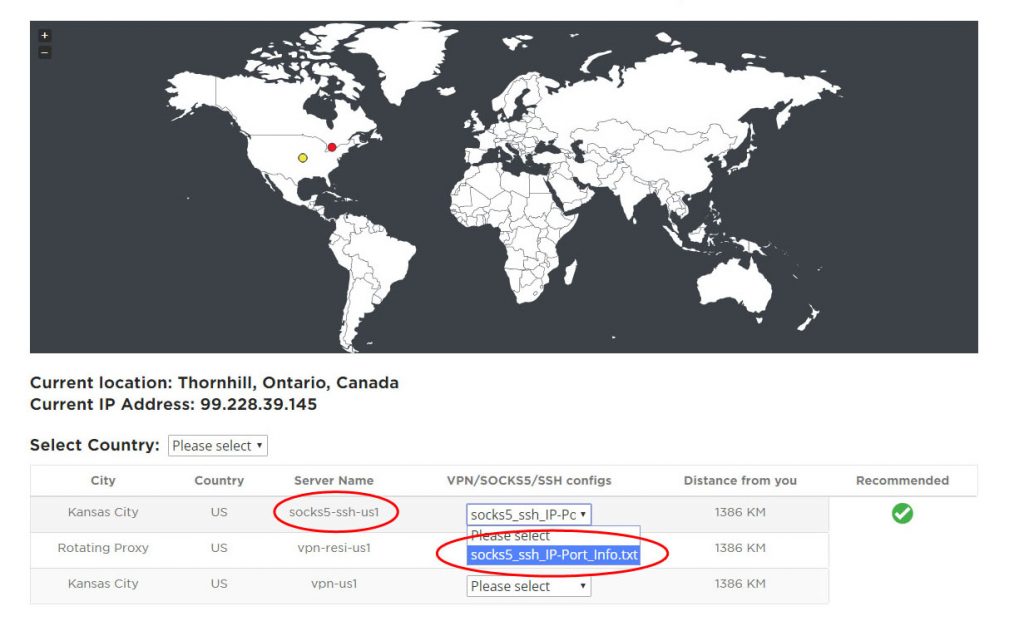
To find the closest SSH and SOCKS5 server location, visit our Server Map page here. SSH and SOCKS5 IP and Port information can downloaded be selecting “socks5-ssh-{country}”
Step 1 – Log into the OpenWRT Console
If this is your first time login you will have to use telnet to gain access to the Router CLI in order to update the root password.
# passwd root
# <Enter new root password>
Now you can log in with SSH and start configuring the Router

Step 2 – Install Packages
The following packages are required to be installed as addons to the pre-installed out of the box software. These packages are freely available from Open WRT Package Manager.
# opkg install redsocks
# opkg install openssh-client
# opkg install openssh-keygen
Step 3 – Create Private/Public Key pair on OpenWRT Router
In the next step we will need to create a key pair to that we will use to authenticate the SSH session from our OpenWRT Router to the DNSFlex Server.
# ssh-keygen -t rsa -f /root/.ssh/id_rsa -N ”
Generating public/private rsa key pair.
Your identification has been saved in /root/.ssh/id_rsa.
Your public key has been saved in /root/.ssh/id_rsa.pub.
The key fingerprint is:
SHA256:8R2TNBtkg8dg2mOY8s3im6eG6smSByDhjjQIVIPWNwI root@OpenWrt
The key’s randomart image is:
+—[RSA 2048]—-+
|.E=o o=B |
|oo o.o *.oo* |
|=. o o = +.= |
|++ o * o o |
|=.. S + . |
|… . . |
| o .. |
| o…. .o. |
| +=. .+o |
+—-[SHA256]—–+
Step 4 – Copy Public RSA Key to DNSFlex Server
The DNS Flex server will be used to terminate all SSH traffic to proxy the traffic to and from your network infrastructure. In order to authenticate the Routers SSH session you must copy to public RSA key to the DNSFlex Proxy server. At the time of this article there is no automated process to upload the key file. Please open a ticket with DNSFlex support to have this process implemented for you.
The key can be located from the default location as follows:
# cat /root/.ssh/id_rsa.pub
ssh-rsa AAAAB3NzaC1yc2EAAAADAQABAAABAQDJLwmUDW0BIVvKz8ixE4fZURyk+p+ucTUkTFtwoP5h+RvEUb1FL75CAxV1jTeVeSBmFIoXk+bMEaoddTDPDXzwSe5aN7GHWO6LTa/awVvSlhs9vVvjPJxaJba9tfQcMDdO17fPMMo45inDVRgwZhMwlOX6M7o+d6zqZpymNcIWRfnKyU5zJf/qACtua2i3F5YGVUwJFYc06duU3cRVlDBD3/7MdGpjX98WuGpm/vRUyaN7Dzt7IlAzWS9JHDm5DVaNH8NEKOnGBJhqkVVIHR9zVtfEKck5hC8DOk9zRWZRE1ScPaA+D35Ih0iWz2IaRImR7hV6zrVgs8TTmcMnrred root@OpenWrt
Step 5 – Test the SSH Connection
Once the Public key has been installed onto the DNSFlex SSH server you can test connectivity by performing the following commands:
# ssh -qfN -i /root/.ssh/id_rsa -D 192.168.1.1:1337 -p 61313 -l <username> <DNSFlex Server IP>
# netstat -an | grep 1337
tcp 0 0 192.168.1.1:1337 0.0.0.0:* LISTEN
# netstat -an | grep 61313
tcp 0 0 99.228.44.149:39417 70.35.193.181:61313 ESTABLISHED
-q option used for running in quiet mode
-f option forks the process and tunnel create command runs in background
-N option tells ssh that we don’t send any command once the tunnel setup completed
-i option tells ssh to select a file from which the identity (private key) for public key authentication is read
-D option used to select listening port. It must be > 1023 to bind as a normal user. 1337 is default port for normal socks server, you can use anything you want as port number
-p option used to select the port to connect to on the remote host. This can be specified on a per-host basis in the configuration file.
Step 6 – Socksifying Router Script
Create the following Router init script in to automatically startup the SSH Tunnel, Redsocks daemon and create IPTABLES rules.
6.1. Create the startup script in “/etc/init.d/ssh_tunnel”
#!/bin/shTMP=/tmp/ssh_tunnel ; mkdir -p $TMP
#Router IP Address
ROUTERIP=”192.168.1.1″
#SOCKS5 Dynamic Forwarding Port
DPORT=”1337″
REDSOCKS_TCP_PORT=$(expr $DPORT + 1)
REDSOCKS_LOG=$TMP/redsocks.log
REDSOCKS_CONF=$TMP/redsocks.conf
SUBNET_INTERFACE=br-lan
#DNSFlex SSH Username
USER=”john_d13″
########################################################################
# Start SSH Tunnel
######################################################################
if [ $(netstat -an | grep $DPORT | wc -c) -ne 0 ]
then
echo “ssh tunnel is connected, exiting …”
exit
else
echo “connecting to dnsflex ssh Tunnel”
ssh -qfN -i /root/.ssh/id_rsa -D $ROUTERIP:$DPORT -p 61313 -l $USER sproxy.dnsflex.com
fi
########################################################################
# Redsocks configuration
########################################################################
cat << EOF > $REDSOCKS_CONF
base {
log_info = on;
log = “file:$REDSOCKS_LOG”;
daemon = on;
redirector = iptables;
}
redsocks {
local_ip = 0.0.0.0;
local_port = $REDSOCKS_TCP_PORT;
ip = $ROUTERIP;
port = $DPORT;
type = socks5;
}
EOF
#######################################################################
# Start Redsocks
#######################################################################
echo “starting Redsocks”
redsocks -c $REDSOCKS_CONF -p /dev/null
########################################################################
# IPtables setup
########################################################################
echo “starting IPtables rules”
# create the REDSOCKS target
iptables -t nat -N REDSOCKS
# don’t route unroutable addresses
iptables -t nat -A REDSOCKS -d 0.0.0.0/8 -j RETURN
iptables -t nat -A REDSOCKS -d 10.0.0.0/8 -j RETURN
iptables -t nat -A REDSOCKS -d 127.0.0.0/8 -j RETURN
iptables -t nat -A REDSOCKS -d 169.254.0.0/16 -j RETURN
iptables -t nat -A REDSOCKS -d 172.16.0.0/12 -j RETURN
iptables -t nat -A REDSOCKS -d 192.168.0.0/16 -j RETURN
iptables -t nat -A REDSOCKS -d 224.0.0.0/4 -j RETURN
iptables -t nat -A REDSOCKS -d 240.0.0.0/4 -j RETURN
# redirect statement sends everything else to the redsocks
# proxy input port
iptables -t nat -A REDSOCKS -p tcp -j REDIRECT –to-ports $REDSOCKS_TCP_PORT
# if it came in on eth0, and it is tcp, send it to REDSOCKS
iptables -t nat -A PREROUTING -i $SUBNET_INTERFACE -p tcp -j REDSOCKS
# Use this one instead of the above if you want to proxy the local
# networking in addition to the subnet stuff. Redsocks listens on
# all interfaces with local_ip = 0.0.0.0 so no other changes are
# necessary.
#iptables -t nat -A PREROUTING -p tcp -j REDSOCKS
# don’t forget to accept the tcp packets from eth0
iptables -A INPUT -i $SUBNET_INTERFACE -p tcp –dport $REDSOCKS_TCP_PORT -j ACCEPT
6.2. Create a sym link for Run Command Script (rc.d) to start the program at boot time
6.3. Socksify Kill Script
Run the following script to kill the redsocks process, close connection to the SSH tunnel and remove IPTABLES re-route rules.
Create the file “/etc/init.d/kill_ssh_tunnel.sh“
# This script will purge the socksifying router
########################################################################iptables -t nat -F REDSOCKS
iptables -t nat -F PREROUTING
iptables -t nat -F POSTROUTING
iptables -F INPUT
iptables -F FORWARD
iptables -t nat -X REDSOCKS
killall redsocks
killall ssh
/etc/init.d/firewall restart
Step 7 – Create Process Monitor Script
Create the following script to monitor the SSH Tunnel for an active connection to the DNSFlex Proxy server. The script will run every 1 minutes and restart the process if a failure is detected.
# /etc/init.d/cron enable#crontab -e*/1 * * * * /etc/init.d/ssh_tunnel > /tmp/cron.log 2>&1
That’s it! Your tunnel is now connected and all your network infrastructure traffic is being routed through the Socksifying Router. You can verify remote connectivity to the proxy tunnel by visiting http://whatismyip.com.