


Nintendo Wii DNS Configuration
Before starting, please take note of your current DNS server IP’s for future reference in the event you wish to revert back to the default settings. Follow these simple guidelines in order to get your Wii U setup with DNSFlex in no time!
Step1
Power on your Wii console and press the A Button on the Wii Remote to reach the Wii main menu. Use the Wii Remote to select the “Wii” button.
Step 2
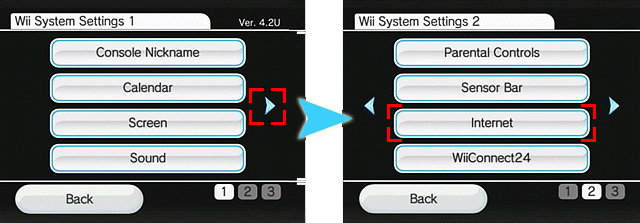
Select “Wii Settings” to access the “Wii System Settings” menu
Step 3
Using the arrow on the right side of the screen, scroll to page two and select “Internet.”
Step 4
Select “Connection Settings.”
Step 5
Select “Connection 1: None.” (If a connection has already been established, you will need to erase the Connection Setting.

Step 6
Select “Wireless Connection.“
Step 7
Select “Manual Setup.”

Step 8
If you know it, enter the name of your wireless network. If not, click here to get help locating it
Step 9
Next, you will choose security type (if any) and enter your wireless password. If you need help finding this information, click here
Step 10
On the “Auto-Obtain IP Address” screen, click “Yes,” then the right arrow to go to the next page.
Step 11
On the screen for “Auto-Obtain DNS,” choose “No,” then “Advanced Settings. In this section enter the two closest DNS Server IP Addresses for “Primary DNS” and “Secondary DNS” respectively. The DNS locator map can be found in the DNSFlex Dashboard page: (https://dnsflex.com/billing)
Step 12
The next section will ask you to configure a proxy server. Click “Don’t Use” to continue.
Step 13
The last screen will list the MTU (Maximum Transmission Unit) value. It’s recommended that you do not change this number.
Step 14
Select “Save” and you will be prompted to run the connection test. When the test is completed, you should see the following screen:
Note: As long as you see “The connection test was successful,” the “Wii Support Code” does not matter and can be ignored. If the connection test succeeds, then your Wii is now connected to the internet. Click here to find out what’s next!
Situation Not Resolved:
If the connection test was not successful, you will receive an error code. Use the error code lookup to find more information on how to resolve this error.
Note: Whenever making any manual changes to your network connectivity it is always best practise to reboot your device in order for the changes to propagate. Please proceed to reboot your Wii U following this tutorial. Congratulations, you are now fully setup to use DNSFlex services!