

How to Route All Network Traffic (system wide) from a PC securely through an SSH Tunnel + ProxyCap + SOCKS5 Proxy
Note: We no longer support SSH Services
This tutorial will provide instructions on how to route all network traffic from your Operating system including all or selected applications through the SOCKS5 tunnel to provide full end to end encryption of your data. Keep prying eyes away by securing all of your network traffic to the DNS Flex SOCKS5 Proxy server.
Note: Before beginning you must be subscribed to DNSFlex “Total Security” to gain access to a SOCKS5 Proxy server. If you haven’t done so already, log into the dashboard to create a username and password. These credentials are applicable to both SSH and SOCKS5 authentication.
Technical Level
- Beginner – Moderate
Prerequisites
Pros
- Selectively choose which application or global proxy
- Masks your source IP and Geographical Location
- Full Data Encryption including TCP and UDP to prevent DNS leaks
Cons
- Encrypted data will slow down your network connection due to overhead and compression
- Having to install 2 seperate applications
Before you begin – DNSFlex SOCKS5 and SSH Server information
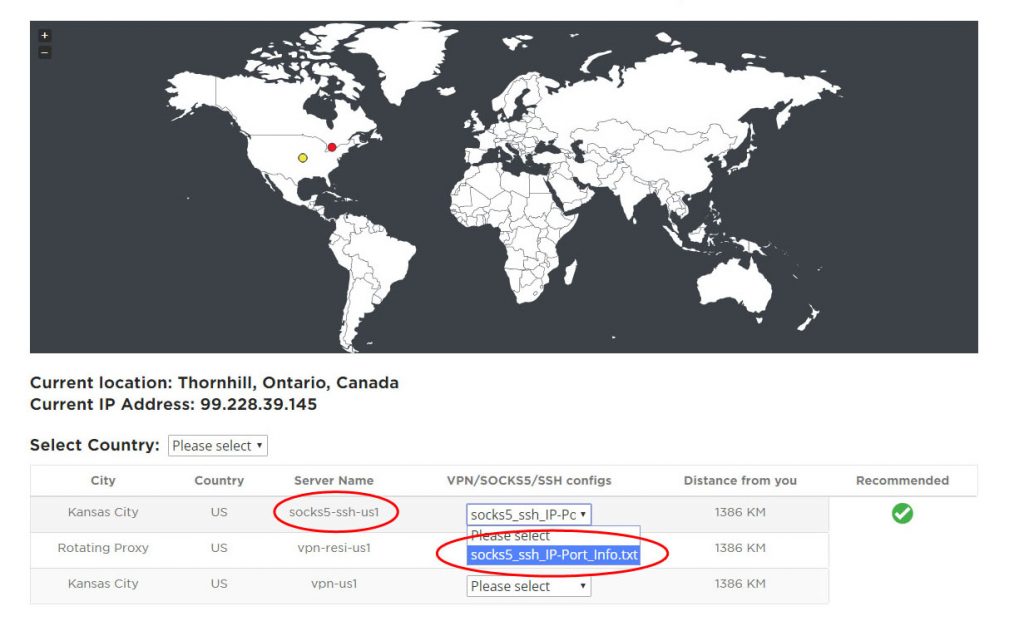
To find the closest SSH and SOCKS5 server location, visit our Server Map page here. SSH and SOCKS5 IP and Port information can downloaded be selecting “socks5-ssh-{country}”
Step 1 – Create the SSH Tunnel
!!! Note to MAC users !!! This tutorial will document the steps to configure Bitvise SSH Tunnel on Windows Operating system. Bitvise unfortunately does not support MAC OSX, please refer to the document on Creating SSH Tunnel using PuTTY here then proceed to the next step in this tutorial.
During our lab testing we documented a number of SSH clients, in particular a client that fared well with SOCKS5 decoding and processing performance. Most importantly, one that has the capability to auto-start on system boot.
1.1. Download the Bitvise application and perform the default installation on your PC. You will require administrative privileges to perform the installation.
1.2. Once installed, fire up the bitvise GUI and navigate to the “Login” tab on the upper navigation bar. Enter the following information:
- host: (DNSFlex SOCKS5 Server Hostname)
- port: 61313
- username: (DNSFlex SOCKS5 username)
- password: (DNSFlex SOCKS5 password)
- Store Encrypted passwrod in profile: enable
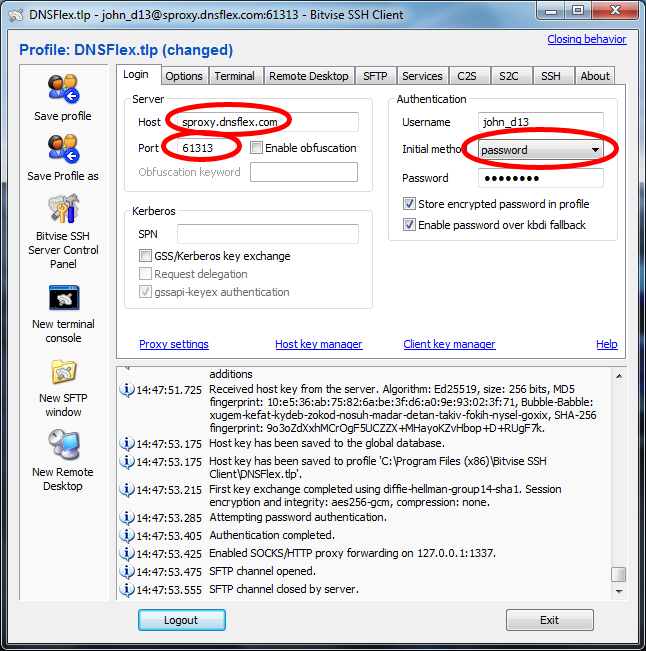
Note: What we are doing here is creating a connection to the DNSFlex SSH server to establish the tunnel.
1.3. Next, select the “Services” tab on the upper navigation bar. Enter the following information:
- SOCKS/HTTP Proxy Forwarding: Enable
- Listen Interface: 127.0.0.1
- Listen port: 1337
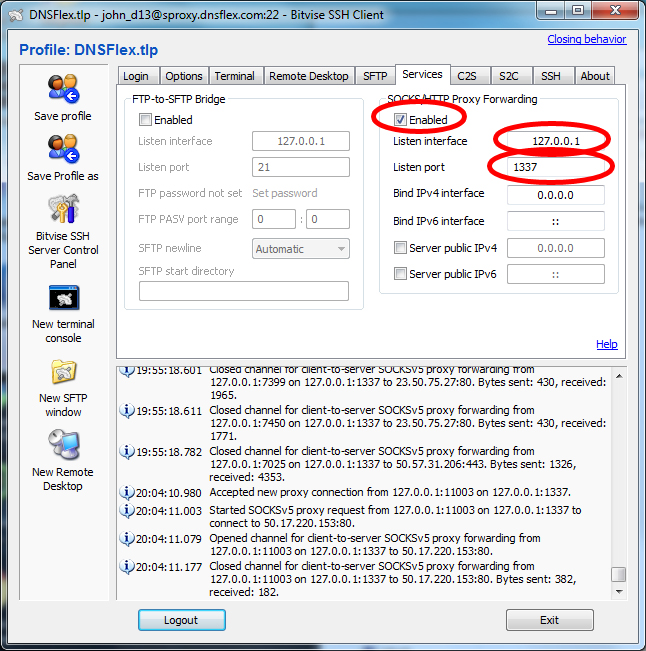
Note: What we accomplished in this step is create a Local SOCKS5 dynamic forwarding port that will listen for any incoming SOCKS5 TCP or UDP connections from the applicants running on your computer. in the next step we will use ProxyCap to route this traffic into the SSH Proxy Tunnel.
1.4. Click on the “Save Profile as” button from the left menu pane and choose your folder destination. In this example I choose “C:\Program Files (x86)\Bitvise SSH Client\DNSFlex.tlp”
Step 2 – How to make Bitvise SSH Tunnel auto start on Windows boot
In step 1 you created the Bitvise SSH Tunnel profile but have yet to establish a connection to the Proxy server. In this step we will show you how to use that profile and create a boot up script so that every time you log into Windows the Bitvise application will automatically start up.
2.1. Navigate to the Windows “Menu” -> “All Programs“. Locate the “Startup” folder, right click then select “Open“. When the folder view appears you will create a notepad file named “bitvise_autostart.bat” with the following contents:
cd “C:\Program Files (x86)\Bitvise SSH Client\”
BvSsh.exe -profile=DNSFlex.tlp -loginOnStartup /minimized
That’s it! Double click the batch file to start the Bitvise tunnel immediately or reboot your computer to validate the startup script works.
Step 3 – Install ProxyCap to route all your PC network traffic to the local SOCKS5 server
3.1. Download and install ProxyCap onto your operating system.
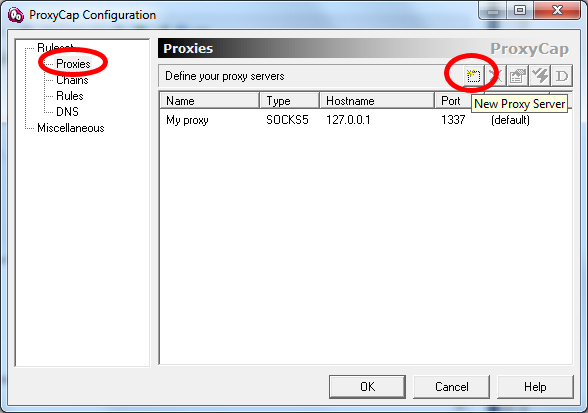
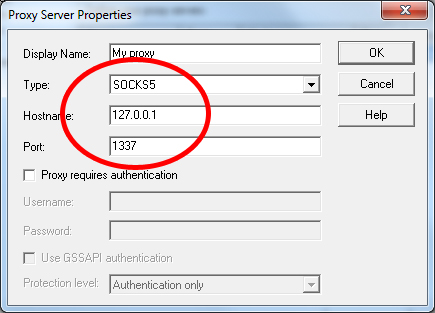
3.2. Once the application has been installed and loaded enter into the Configuration page. Locate the “Proxies” section under the “Ruleset“Category and enter the following information:
- Display name: My Proxy
- Type: SOCKS5
- Hostname: 127.0.0.1
- Port: 1337
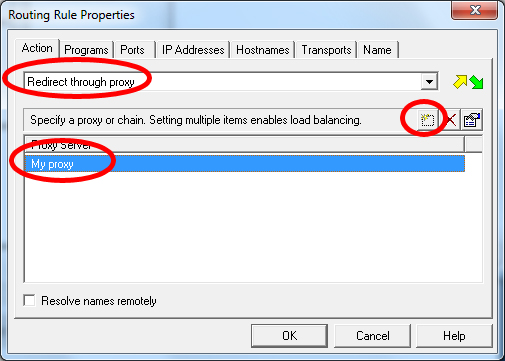
3.3. Next, navigate to the “Rules” category and click on “Add Rule“. Click on the “Action” tab and select “Redirect through proxy“. Specify proxy “My Proxy“
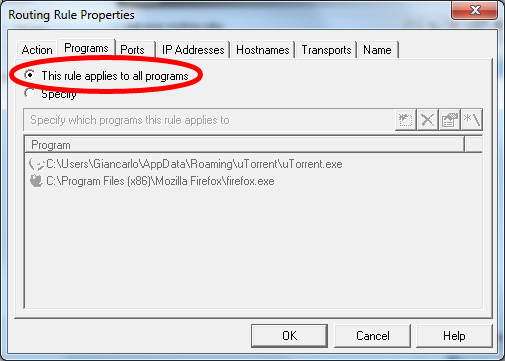
3.4. Click on the “Programs” tab and select “This rule applies to all programs“. Note: you can select individual applications or system wide data to proxy, in this example we chose system wide.
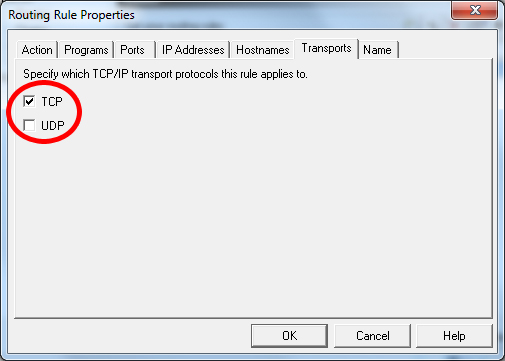
3.5. Click on the “Transports” tab and select your choice of protocols you would like to proxy. Internet web traffic uses the TCP protocol. If you would like to route DNS traffic then you will need to choose UDP also. Click on “OK” to complete the setup.
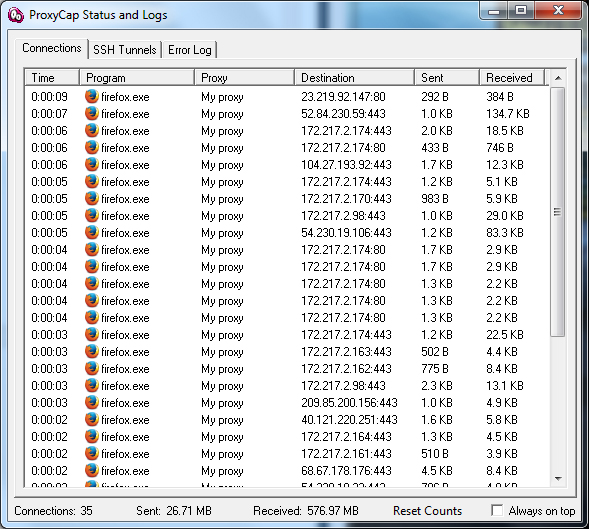
3.6. That’s it, you’re all done! Fire up a web browser and observe the connections being proxied from the ProxyCap status monitor.